context
为什么需要context
在context之前,要管理协程退出需要借助通道close的机制,该机制会唤醒所有监听该通道的协程,并触发相应的退出逻辑。
为了能够优雅地管理协程的退出,特别是多个协程甚至网络服务之间的退出,Go引入了context包。
context使用方式
context接口详解
context.Context其实是一个接口,提供了以下4种方法:
1
2
3
4
5
6
type Context interface {
	Deadline() (deadline time.Time, ok bool)
	Done() <-chan struct{}
	Err() error
	Value(key any) any
}
Deadline方法的第一个返回值表示还有多久到期,第二个返回值表示是否到期。Done是使用最频繁的方法,其返回一个通道,一般的做法是监听该通道的信号,如果收到信号则表示通道已经关闭,需要执行退出。如果通道已经关闭,则Err()返回退出的原因。value方法返回指定key对应的value,这是context携带的值。
context中携带值是非常少见的,其一般在跨程序的API中使用,并且该值的作用域在结束时终结。key必须是访问安全的,因为可能有多个协程同时访问它。一种常见的策略是在context中存储授权相关的值,这些鉴权不会影响程序的核心逻辑。
context退出与传递
context是一个接口,这意味着需要有具体的实现。用户可以按照接口中定义的方法,严格实现其语义。当然,一般用得最多的还是Go标准库的简单实现。调用context.Background函数或context.TODO函数会返回最简单的context实现。context.Background函数一般作为根对象存在,其不可以退出,也不能携带值。要具体地使用context的功能,需要派生出新的context,配套的使用函数如下,其中前三个函数用于处理退出。
1
2
3
4
func WithCancel(parent Context) (ctx Context, cancel CancelFunc)
func WithDeadline(parent Context, d time.Time) (Context, CancelFunc)
func WithTimeout(parent Context, timeout time.Duration) (Context, CancelFunc)
func WithValue(parent Context, key, val any) Context
- WithCancel函数返回一个子context并且有cancel退出方法。子context在两种情况下会退出,一种情况是调用cancel,另一种情况是当参数中的父context退出时,该context及其关联的子context都将退出。
- WithTimeout函数指定超时时间,当超时发生后,子context将退出。因此子context的退出有3种时机,一种是父context退出;一种是超时退出;一种是主动调用cancel函数退出。
- WithDeadline和WithTimeout函数的处理方法相似,不过其参数指定的是最后到期的时间。
- WithValue函数返回带key-value的子context。
- WithValue函数返回带key-value的子context。
在协程中,childCtx是preCtx的子context,其设置的超时时间为300ms。但是preCtx的超时时间为100 ms,因此父context退出后,子context会立即退出,实际的等待时间只有100ms。
1
2
3
4
5
6
7
8
9
10
11
12
13
14
15
16
17
18
func main() {
	ctx := context.Background()
	before := time.Now()
	preCtx, _ := context.WithTimeout(ctx, 100*time.Millisecond)
	go func() {
		childCtx, _ := context.WithTimeout(preCtx, 300*time.Millisecond)
		select {
		case <-childCtx.Done():
			after := time.Now()
			fmt.Println("child during:", after.Sub(before).Milliseconds()) // child during: 100
		}
	}()
	select {
	case <-preCtx.Done():
		after := time.Now()
		fmt.Println("preCtx during:", after.Sub(before).Milliseconds()) // preCtx during: 100
	}
}
当修改preCtx的超时时间为500ms时,子协程的退出不会影响父协程的退出
1
2
3
4
5
6
7
8
9
10
11
12
13
14
15
16
17
18
func main() {
	ctx := context.Background()
	before := time.Now()
	preCtx, _ := context.WithTimeout(ctx, 500*time.Millisecond)
	go func() {
		childCtx, _ := context.WithTimeout(preCtx, 300*time.Millisecond)
		select {
		case <-childCtx.Done():
			after := time.Now()
			fmt.Println("child during:", after.Sub(before).Milliseconds()) // child during: 300
		}
	}()
	select {
	case <-preCtx.Done():
		after := time.Now()
		fmt.Println("preCtx during:", after.Sub(before).Milliseconds()) // preCtx during: 500
	}
}
所以context退出的传播关系是父context的退出会导致所有子context的退出,而子context的退出不会影响父context。
context原理
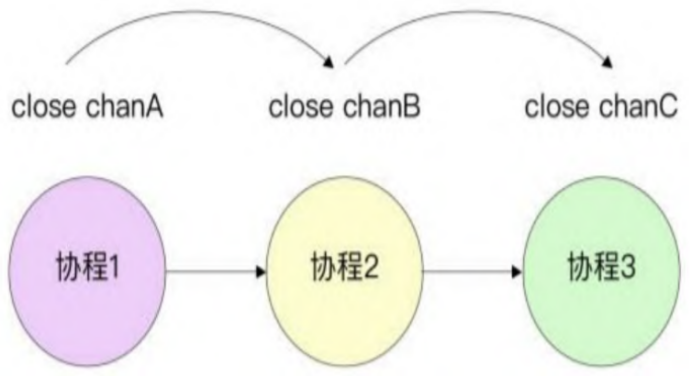
context在很大程度上利用了通道在close时会通知所有监听它的协程这一特性来实现。每个派生出的子协程都会创建一个新的退出通道,组织好context之间的关系即可实现继承链上退出的传递。
三个协程中,关闭通道A会连带关闭调用链上的通道B、通道C。
 Context.Background函数和Context.TODO函数是相似的,它们都返回一个标准库中定义好的结构体emptyCtx。
1
2
3
4
5
6
7
8
9
10
11
12
13
14
type emptyCtx int

var (
	background = new(emptyCtx)
	todo       = new(emptyCtx)
)

func Background() Context {
	return background
}

func TODO() Context {
	return todo
}
emptyCtx什么内容都没有,其不可以被退出,也不能携带值,一般作为最初始的根对象。
1
2
3
4
5
6
7
8
9
10
11
12
13
14
15
func (*emptyCtx) Deadline() (deadline time.Time, ok bool) {
	return
}

func (*emptyCtx) Done() <-chan struct{} {
	return nil
}

func (*emptyCtx) Err() error {
	return nil
}

func (*emptyCtx) Value(key any) any {
	return nil
}
当调用WithCancel或WithTimeout函数时,会产生一个子context结构cancelCtx,并保留了父context的信息。children字段保存当前context之后派生的子context的信息,每个context都会有一个新的done通道,这保证了子context的退出不会影响父context。
1
2
3
4
5
6
7
type cancelCtx struct {
	Context
	mu       sync.Mutex
	done     atomic.Value
	children map[canceler]struct{}
	err      error
}
WithTimeout函数最终会调用WithDeadline函数,以WithDeadline函数为例
1
2
3
4
5
6
7
8
9
10
11
12
13
14
15
16
17
18
19
20
21
22
23
24
25
26
27
28
29
30
31
32
33
34
func WithDeadline(parent Context, d time.Time) (Context, CancelFunc) {
	if parent == nil {
		panic("cannot create context from nil parent")
	}

// 先判断父context是否比当前设置的超时参数d先退出,如果是,那么子协程会随着父context的退出而退出,没有必要再设置定时器。
if cur, ok := parent.Deadline(); ok && cur.Before(d) {
		// The current deadline is already sooner than the new one.
		return WithCancel(parent)
	}

    // 创建一个新的context,初始化通道。
	c := &timerCtx{
		cancelCtx: newCancelCtx(parent),
		deadline:  d,
	}

    // 将子context加入父协程的children哈希表中,并开启一个定时器。
	propagateCancel(parent, c)
	dur := time.Until(d)
	if dur <= 0 {
c.cancel(true, DeadlineExceeded) // deadline has already passed
		return c, func() { c.cancel(false, Canceled) }
	}
	c.mu.Lock()
	defer c.mu.Unlock()
	if c.err == nil {
        // 当定时器到期时,会调用cancel方法关闭通道。
		c.timer = time.AfterFunc(dur, func() {
			c.cancel(true, DeadlineExceeded)
		})
	}
	return c, func() { c.cancel(true, Canceled) }
}
1
2
3
4
5
6
7
8
9
10
11
12
13
func (c *timerCtx) cancel(removeFromParent bool, err error) {
	c.cancelCtx.cancel(false, err)
	if removeFromParent {
		// Remove this timerCtx from its parent cancelCtx's children.
		removeChild(c.cancelCtx.Context, c)
	}
	c.mu.Lock()
	if c.timer != nil {
		c.timer.Stop()
		c.timer = nil
	}
	c.mu.Unlock()
}
cancel方法会关闭自身的通道,并遍历当前children哈希表,调用当前所有子context的退出函数,因此其可以产生继承链上连锁的退出反应。
1
2
3
4
5
6
7
8
9
10
11
12
13
14
15
16
17
18
19
20
21
22
23
24
25
26
27
func (c *cancelCtx) cancel(removeFromParent bool, err error) {
	if err == nil {
		panic("context: internal error: missing cancel error")
	}
	c.mu.Lock()
	if c.err != nil {
		c.mu.Unlock()
		return // already canceled
	}
	c.err = err
	d, _ := c.done.Load().(chan struct{})
	if d == nil {
		c.done.Store(closedchan)
	} else {
		close(d)
	}
	for child := range c.children {
		// NOTE: acquiring the child's lock while holding parent's lock.
		child.cancel(false, err)
	}
	c.children = nil
	c.mu.Unlock()

	if removeFromParent {
		removeChild(c.Context, c)
	}
}
当一切结束后,还需要从父context哈希表中移除该context。避免父context退出后,重复关闭子context通道产生错误。
数据争用检查
数据争用
数据争用(data race)在Go语言中指两个协程同时访问相同的内存空间,并且至少有一个写操作的情况。
数据争用检查详解
Go 1.1后提供了强大的检查工具race来排查数据争用问题。race可以使用在多个Go指令中,当检测器在程序中找到数据争用时,将打印报告。该报告包含发生race冲突的协程栈,以及此时正在运行的协程栈。
1
2
3
4
go test -race mypkg
go run -race mysrc.go
go build -race mycmd
go install -race mypkg
race工具原理
race工具借助了ThreadSanitizer[4],ThreadSanitizer是谷歌为了应对内部大量服务器端C++代码的数据争用问题而开发的新一代工具,目前也被Go语言内部通过CGO的形式进行调用。
锁
原子锁
需要有一种机制解决并发访问时数据冲突及内存操作乱序的问题,即提供一种原子性的操作。这通常依赖硬件的支持,例如X86指令集中的LOCK指令,对应Go语言中的sync/atomic包。下例使用了atomic.AddInt64函数将变量加1,这种原子操作不会发生并发时的数据争用问题。
通过sync/atomic包中的原子操作,能构建起一种自旋锁,只有获取该锁,才能执行区域中的代码。
1
2
3
4
5
6
7
8
9
10
11
12
13
14
15
16
var flag, count int64

func add() {
	for {
		if atomic.CompareAndSwapInt64(&flag, 0, 1) {
			count++
			atomic.StoreInt64(&flag, 0)
			return
		}
	}
}

func main() {
	go add()
	go add()
}
这种自旋锁的形式在Go源代码中随处可见,原子操作是底层最基础的同步保证,通过原子操作可以构建起许多同步原语,例如自旋锁、信号量、互斥锁等。
互斥锁
sync.Mutex构建起了互斥锁,在同一时刻,只会有一个获取锁的协程继续执行,而其他的协程将陷入等待状态,这和自旋锁的功能是类似的,但是其提供了更加复杂的机制避免自旋锁的争用问题。
1
2
3
4
5
6
7
8
9
10
11
12
13
var count int64
var m sync.Mutex

func add() {
	m.Lock()
	defer m.Unlock()
	count++
}

func main() {
	go add()
	go add()
}
互斥锁是一种混合锁,其实现方式包含了自旋锁,同时参考了操作系统锁的实现。
1
2
3
4
type Mutex struct {
	state int32    // 当前锁状态
	sema  uint32 // 信号量
}
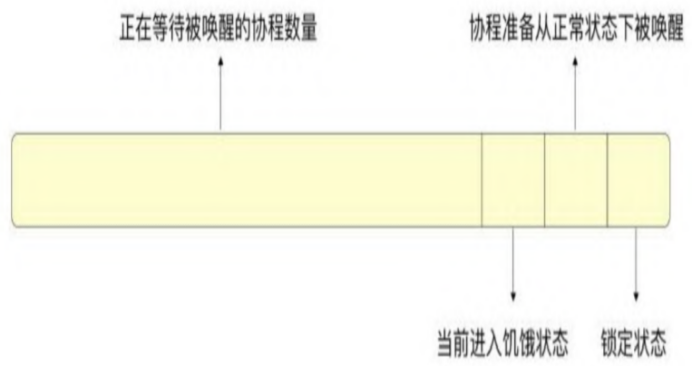
state通过位图的形式存储了当前锁的状态
 其中包含锁是否为锁定状态、正在等待被锁唤醒的协程数量、两个和饥饿模式有关的标志。为了解决某一个协程可能长时间无法获取锁的问题,Go 1.9之后使用了饥饿模式。在饥饿模式下,unlock会唤醒最先申请加速的协程,从而保证公平。
加锁
1
2
3
4
5
6
7
8
9
10
11
func (m *Mutex) Lock() {
	// 使用原子操作快速抢占锁,如果抢占成功则立即返回
	if atomic.CompareAndSwapInt32(&m.state, 0, mutexLocked) {
		if race.Enabled {
			race.Acquire(unsafe.Pointer(m))
		}
		return
	}
	// 如果抢占失败则调用lockSlow方法
	m.lockSlow()
}
在下面4种情况下,自旋状态立即终止:
- 程序在单核CPU上运行。
- 逻辑处理器P小于或等于1。
- 当前协程所在的逻辑处理器P的本地队列上有其他协程待运行。
- 自旋次数超过了设定的阈值。
当长时间未获取到锁时,就进入互斥锁的第2个阶段,使用信号量进行同步。如果加锁操作进入信号量同步阶段,则信号量计数值减1。如果解锁操作进入信号量同步阶段,则信号量计数值加1。当信号量计数值大于0时,意味着有其他协程执行了解锁操作,这时加锁协程可以直接退出。当信号量计数值等于0时,意味着当前加锁协程需要陷入休眠状态。
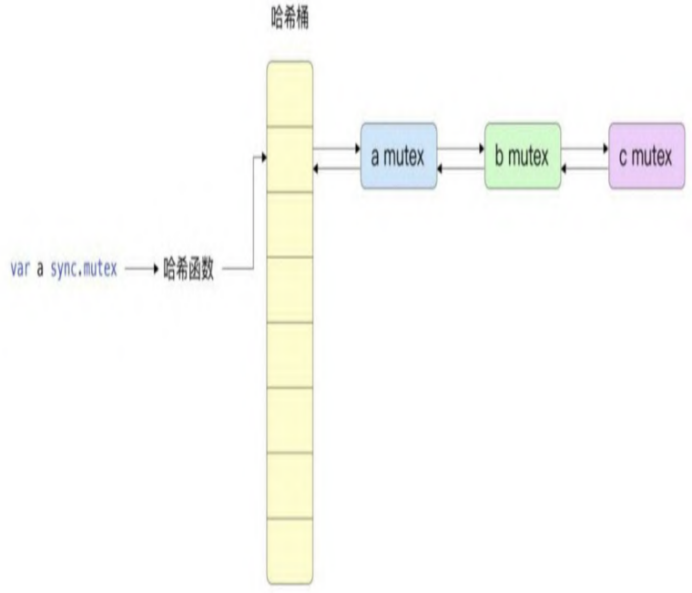
在互斥锁第3个阶段,所有锁的信息都会根据锁的地址存储在全局semtable哈希表中。
1
2
3
4
var semtable [semTabSize]struct {
	root semaRoot
	pad  [cpu.CacheLinePadSize - unsafe.Sizeof(semaRoot{})]byte
}
哈希函数为根据信号量地址简单取模。
1
2
3
func semroot(addr *uint32) *semaRoot {
	return &semtable[(uintptr(unsafe.Pointer(addr))>>3)%semTabSize].root
}
先根据哈希函数查找当前锁存储在哪一个哈希桶(bucket)中。哈希结果相同的多个锁可能存储在同一个哈希桶中,哈希桶中通过一根双向链表解决哈希冲突问题。
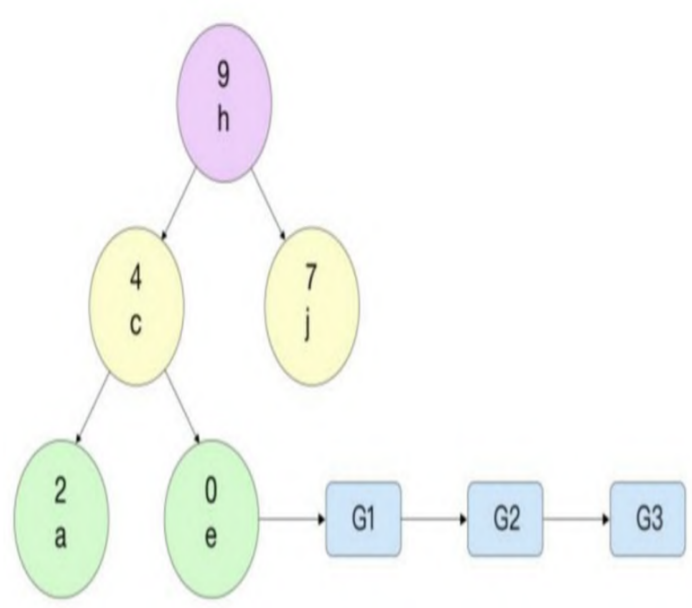
 哈希桶中的链表还被构造成了特殊的treap树
 treap树是一种引入了随机数的二叉搜索树,其实现简单,引入的随机数及必要时的旋转保证了比较好的平衡性。将哈希桶中锁的数据结构设计为二叉搜索树的主要目的是快速查找到当前哈希桶中是否存在已经存在过的锁,这时能够以log2N的时间复杂度进行查找。如果已经查找到存在该锁,则将当前的协程添加到等待队列的尾部。
如果不存在该锁,则需要向当前treap树中添加一个新的元素。值得注意的是,由于在访问哈希表时,仍然可能面临并发的数据争用,因此这里也需要加锁,但是此处的锁和互斥锁有所不同,其实现方式为先自旋一定次数,如果还没有获取到锁,则调用操作系统级别的锁,在Linux中为pthread mutex互斥锁。所以Go语言中的互斥锁算一种混合锁,它结合了原子操作、自旋、信号量、全局哈希表、等待队列、操作系统级别锁等多种技术,在正常情况下是基本不会进入操作系统级别的锁。
锁被放置到全局的等待队列中并等待被唤醒,唤醒的顺序为从前到后,遵循先入先出的准则,这样保证了公平性。当长时间无法获取锁时,当前的互斥锁会进入饥饿模式。在饥饿模式下,为了保证公平性,新申请锁的协程不会进入自旋状态,而是直接放入等待队列中。放入等待队列中的协程会切换自己的执行状态,让渡执行权利并进入新的调度循环,这不会暂停线程的运行。
释放
1.如果当前锁处于普通的锁定状态,即没有进入饥饿状态和唤醒状态,也没有多个协程因为抢占锁陷入堵塞,则Unlock方法在修改mutexLocked状态后立即退出(快速路径)。否则,进入慢路径调用unlockSlow方法。
1
2
3
4
5
6
7
8
9
10
11
12
13
14
func (m *Mutex) Unlock() {
	if race.Enabled {
		_ = m.state
		race.Release(unsafe.Pointer(m))
	}

	// Fast path: drop lock bit.
	new := atomic.AddInt32(&m.state, -mutexLocked)
	if new != 0 {
		// Outlined slow path to allow inlining the fast path.
		// To hide unlockSlow during tracing we skip one extra frame when tracing GoUnblock.
		m.unlockSlow(new)
	}
}
2.判断锁是否重复释放。锁不能重复释放,否则会在运行时报错。
1
2
3
if (new+mutexLocked)&mutexLocked == 0 {
	throw("sync: unlock of unlocked mutex")
}
3.如果锁当前处于饥饿状态,则进入信号量同步阶段,到全局哈希表中寻找当前锁的等待队列,以先入先出的顺序唤醒指定协程。 4.如果锁当前未处于饥饿状态且当前mutexWoken已设置,则表明有其他申请锁的协程准备从正常状态退出,这时锁释放后不用去当前锁的等待队列中唤醒其他协程,而是直接退出。如果唤醒了等待队列中的协程,则将唤醒的协程放入当前协程所在逻辑处理器P的runnext字段中,存储到runnext字段中的协程会被优先调度。如果在饥饿模式下,则当前协程会让渡自己的执行权利,让被唤醒的协程直接运行,这是通过将runtime_Semrelease函数第2个参数设置为true实现的。
1
2
3
4
5
6
7
8
9
10
11
12
13
14
15
16
17
18
19
20
21
22
23
24
25
26
27
28
29
30
31
32
33
34
35
36
37
38
39
func (m *Mutex) Unlock() {
	if race.Enabled {
		_ = m.state
		race.Release(unsafe.Pointer(m))
	}

	// Fast path: drop lock bit.
	new := atomic.AddInt32(&m.state, -mutexLocked)
	if new != 0 {
		// Outlined slow path to allow inlining the fast path.
		// To hide unlockSlow during tracing we skip one extra frame when tracing GoUnblock.
		m.unlockSlow(new)
	}
}

func (m *Mutex) unlockSlow(new int32) {
	if (new+mutexLocked)&mutexLocked == 0 {
		throw("sync: unlock of unlocked mutex")
	}
	if new&mutexStarving == 0 {
		old := new
		for {
			//当前没有等待被唤醒的协程或者mutexWoken已设置
			if old>>mutexWaiterShift == 0 || old&(mutexLocked|mutexWoken|mutexStarving) != 0 {
				return
			}
			// 唤醒等待中的协程
			new = (old - 1<<mutexWaiterShift) | mutexWoken
			if atomic.CompareAndSwapInt32(&m.state, old, new) {
				runtime_Semrelease(&m.sema, false, 1)
				return
			}
			old = m.state
		}
	} else {
		// 在饥饿模式下唤醒协程,并立即执行
		runtime_Semrelease(&m.sema, true, 1)
	}
}
读写锁
在同一时间内只能有一个协程获取互斥锁并执行操作,在多读少写的情况下,如果长时间没有写操作,那么读取到的会是完全相同的值,完全不需要通过互斥的方式获取,这是读写锁产生的背景。读写锁通过两种锁来实现,一种为读锁,另一种为写锁。当进行读取操作时,需要加读锁,而进行写入操作时需要加写锁。多个协程可以同时获得读锁并执行。如果此时有协程申请了写锁,那么该写锁会等待所有的读锁都释放后才能获取写锁继续执行。如果当前的协程申请读锁时已经存在写锁,那么读锁会等待写锁释放后再获取锁继续执行。 总之,读锁必须能观察到上一次写锁写入的值,写锁要等待之前的读锁释放才能写入。可能有多个协程获得读锁,但只有一个协程获得写锁。
1
2
3
4
5
6
7
8
9
10
11
12
13
14
15
16
type Stat struct {
	counters map[string]int64
	mutex    sync.RWMutex
}

func (s *Stat) getCounter(name string) int64 {
	s.mutex.RLocker()
	defer s.mutex.RUnlock()
	return s.counters[name]
}

func (s *Stat) setCounter(name string) {
	s.mutex.Lock()
	defer s.mutex.Unlock()
	s.counters[name]++
}
原理
读写锁复用了互斥锁及信号量这两种机制。
1
2
3
4
5
6
7
type RWMutex struct {
	w           Mutex  // 互斥锁
	writerSem   uint32 // 信号量,写锁等待读取完成
	readerSem   uint32 // 信号量,读锁等待写入完成
	readerCount int32  // 当前正在执行的读操作的数量
	readerWait  int32  // 写操作被阻塞时等待的读操作数量
}
读取操作先通过原子操作将readerCount加1,如果readerCount≥0就直接返回,所以如果只有获取读取锁的操作,那么其成本只有一个原子操作。当readerCount<0时,说明当前有写锁,当前协程将借助信号量陷入等待状态,如果获取到信号量则立即退出,没有获取到信号量时的逻辑与互斥锁的逻辑相似。
1
2
3
4
5
6
7
8
9
10
11
12
13
14
func (rw *RWMutex) RLock() {
	if race.Enabled {
		_ = rw.w.state
		race.Disable()
	}
	if atomic.AddInt32(&rw.readerCount, 1) < 0 {
		// A writer is pending, wait for it.
		runtime_SemacquireMutex(&rw.readerSem, false, 0)
	}
	if race.Enabled {
		race.Enable()
		race.Acquire(unsafe.Pointer(&rw.readerSem))
	}
}
读锁解锁时,如果当前没有写锁,则其成本只有一个原子操作并直接退出。
1
2
3
4
5
6
7
8
9
10
11
12
13
14
func (rw *RWMutex) RUnlock() {
	if race.Enabled {
		_ = rw.w.state
		race.ReleaseMerge(unsafe.Pointer(&rw.writerSem))
		race.Disable()
	}
	if r := atomic.AddInt32(&rw.readerCount, -1); r < 0 {
		// Outlined slow-path to allow the fast-path to be inlined
		rw.rUnlockSlow(r)
	}
	if race.Enabled {
		race.Enable()
	}
}
如果当前有写锁正在等待,则调用rUnlockSlow判断当前是否为最后一个被释放的读锁,如果是则需要增加信号量并唤醒写锁。
1
2
3
4
5
6
7
8
9
10
11
func (rw *RWMutex) rUnlockSlow(r int32) {
	if r+1 == 0 || r+1 == -rwmutexMaxReaders {
		race.Enable()
		throw("sync: RUnlock of unlocked RWMutex")
	}
	// A writer is pending.
	if atomic.AddInt32(&rw.readerWait, -1) == 0 {
		// The last reader unblocks the writer.
		runtime_Semrelease(&rw.writerSem, false, 1)
	}
}
读写锁申请写锁时要调用Lock方法,必须先获取互斥锁,因为它复用了互斥锁的功能。接着readerCount减去rwmutexMaxReaders阻止后续的读操作。
但获取互斥锁并不一定能直接获取写锁,如果当前已经有其他Goroutine持有互斥锁的读锁,那么当前协程会加入全局等待队列并进入休眠状态,当最后一个读锁被释放时,会唤醒该协程。
1
2
3
4
5
6
7
8
9
10
11
12
13
14
15
16
17
18
19
func (rw *RWMutex) Lock() {
	if race.Enabled {
		_ = rw.w.state
		race.Disable()
	}
	// First, resolve competition with other writers.
	rw.w.Lock()
	// Announce to readers there is a pending writer.
	r := atomic.AddInt32(&rw.readerCount, -rwmutexMaxReaders) + rwmutexMaxReaders
	// Wait for active readers.
	if r != 0 && atomic.AddInt32(&rw.readerWait, r) != 0 {
		runtime_SemacquireMutex(&rw.writerSem, false, 0)
	}
	if race.Enabled {
		race.Enable()
		race.Acquire(unsafe.Pointer(&rw.readerSem))
		race.Acquire(unsafe.Pointer(&rw.writerSem))
	}
}
解锁时,调用Unlock方法。将readerCount加上rwmutexMaxReaders,表示不会堵塞后续的读锁,依次唤醒所有等待中的读锁。当所有的读锁唤醒完毕后会释放互斥锁。
1
2
3
4
5
6
7
8
9
10
11
12
13
14
15
16
17
18
19
20
21
22
23
func (rw *RWMutex) Unlock() {
	if race.Enabled {
		_ = rw.w.state
		race.Release(unsafe.Pointer(&rw.readerSem))
		race.Disable()
	}

	// Announce to readers there is no active writer.
	r := atomic.AddInt32(&rw.readerCount, rwmutexMaxReaders)
	if r >= rwmutexMaxReaders {
		race.Enable()
		throw("sync: Unlock of unlocked RWMutex")
	}
	// Unblock blocked readers, if any.
	for i := 0; i < int(r); i++ {
		runtime_Semrelease(&rw.readerSem, false, 0)
	}
	// Allow other writers to proceed.
	rw.w.Unlock()
	if race.Enabled {
		race.Enable()
	}
}
可以看出,读写锁在写操作时的性能与互斥锁类似,但是在只有读操作时效率要高很多,因为读锁可以被多个协程获取。